 |
GloDeveloper
|
|
GloDeveloper
|

The GloDeveloper is the application used to create GlobalObjects object databases. All necessary header and source files for classes of persistent objects can be created or maintained. The GlobalObjects-Schema, the Object Creator and the Tables are created.
The GloDeveloper is a typical MDI application. The objects to be edited independently, such as classes, are edited in separate document windows, only dependent objects, such as attributes, are edited in dialogs.
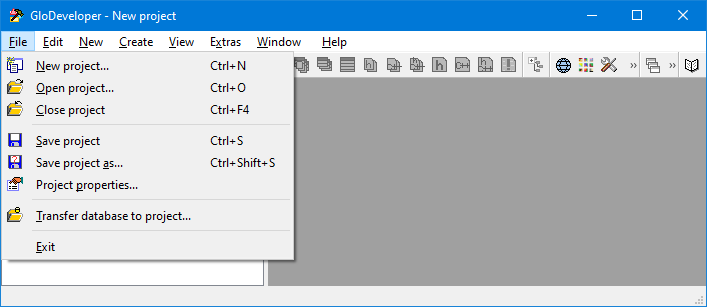
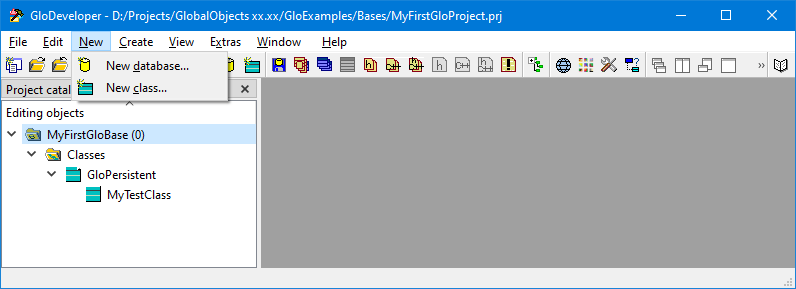
GloDeveloper after the first start:

GloDeveloper.exe "D:\Projects\GlobalObects xx.xx\GloExamples\Bases\SchemaExample.prj"), which is then read in. Object databases are created in projects. The GloDeveloper can manage several object databases in one project. This is useful, for example, if classes are to appear in multiple object databases; they can then be copied from one object database to another, or if cross-object database referencing is desired.
Project files are given the file extension 'prj', and project files can be passed to the GloDeveloper as call parameters. This makes it possible, among other things, to integrate GlobalObjects project files in "Microsoft Visual Studio" and to link the opening of the project file to the GloDeveloper.
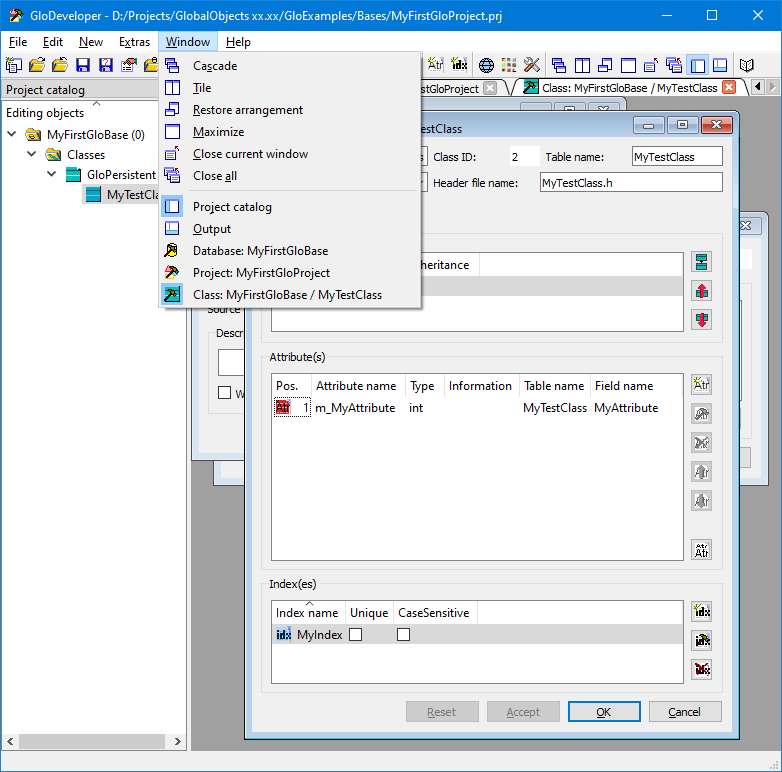
GloDeveloper has two "docked" windows, which can be hidden and the workspace in which the individual document windows are displayed.
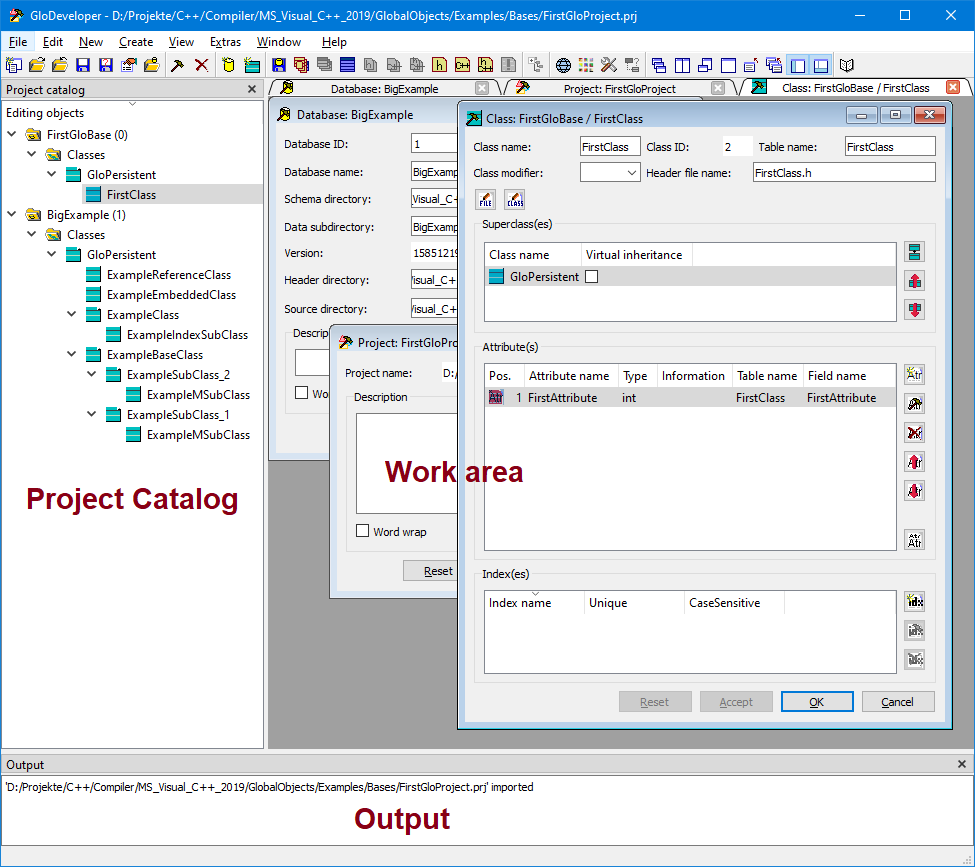
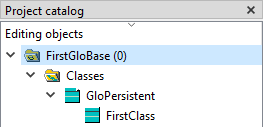
In the window docked on the left, the project catalog is displayed in a tree structure. (Not all) elements of the view can be edited by double-click left-mouse-button or by pressing the enter key for editing in a document window.
Classes can be copied and moved by "drag and drop".
Information is displayed in the output window docked below.

The document windows to be edited are made available in the workspace.
The individual menus and their entries are explained below. Some menu entries are only accessible if corresponding prerequisites are met. For example, a new database can only be created if a project exists. Equivalently, there is a tool button for each menu entry in the toolbar. When the mouse pointer is moved over the buttons, the menu item text is displayed.
Depending on the object currently being edited, the menus and their entries change in context.
Last but not least, it is possible to call up a context menu in each object to be edited by pressing the right mouse button.
The file menu without project allows to initiate a new project, open an existing project or quit the GloDeveloper. The other menu items are accessible when a project is loaded.
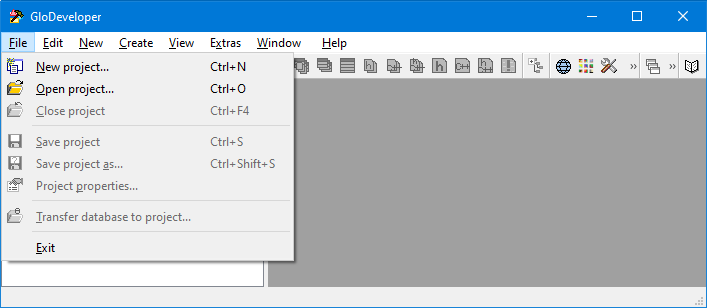

A new project without a name is initiated. If a project is open for editing, the user is offered to save it before closing it if he has made changes.
After initiating a new project, the menu looks quite different:

An existing project can be opened from the file system. If a project is in progress, the user is offered to save it before closing if he has made changes.

A project can be closed. The user is offered to save it before closing it if he has made any changes.
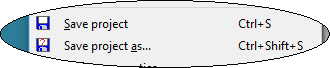
A project can be saved immediately after initiation or later under a name using File / Save project or File / Save project as.... In this example, the project is given the name "MyFirstGloProject" in the directory "D:/Projects/GlobalObjects xx.xx/GloExamples/Bases".

With this menu item the project can be given a description in a Project document window.

An existing database can be taken over with this menu item.
The corresponding Database document window is displayed immediately.

With this menu item GloDeveloper can be terminated. It is offered to the user to save any open project before closing it if he has made changes.
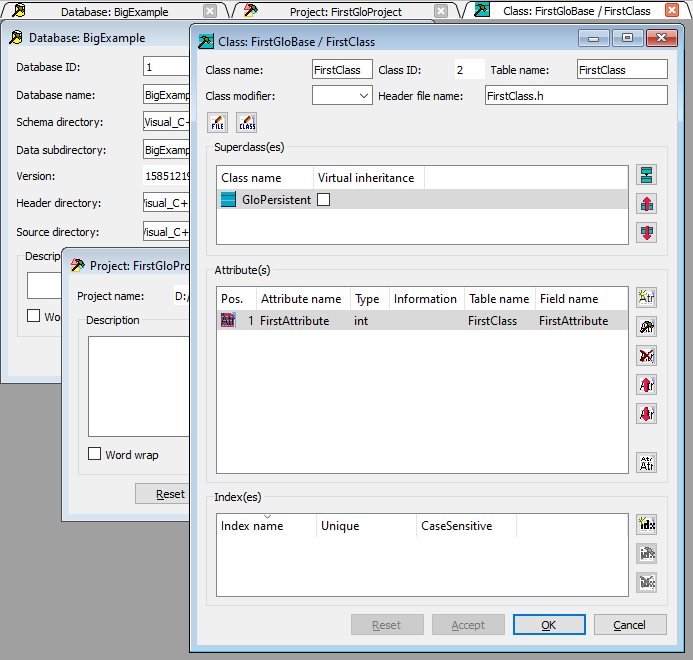
If a database schema is selected in the Project catalog, editing refers to this schema.
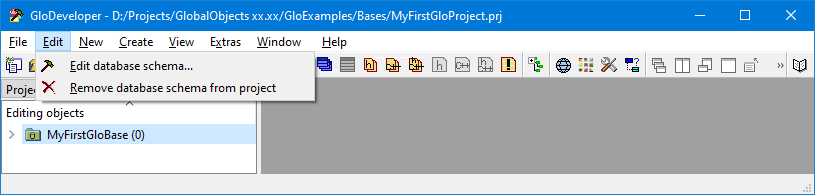

In a Database document window the basic information of a database schema is edited.

The database schema is removed from the project.
If a class directory is selected in the Project catalog, editing refers to this directory.
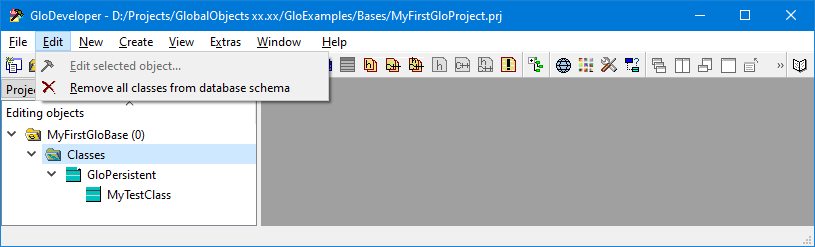

All classes, except the class glo::Persistent, are removed from the parent database schema.
If a class is selected in the Project catalog, editing refers to this class.
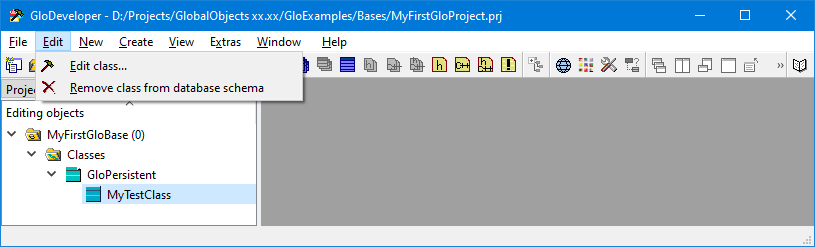

In a Class document window a persistent class is designed.

The selected class, except the class glo::Persistent, is removed from the parent database schema.
If a class in the workspace is active in the document window, the Edit menu refers to it. The individual menu entries are usually also available as tool buttons in the class document window.

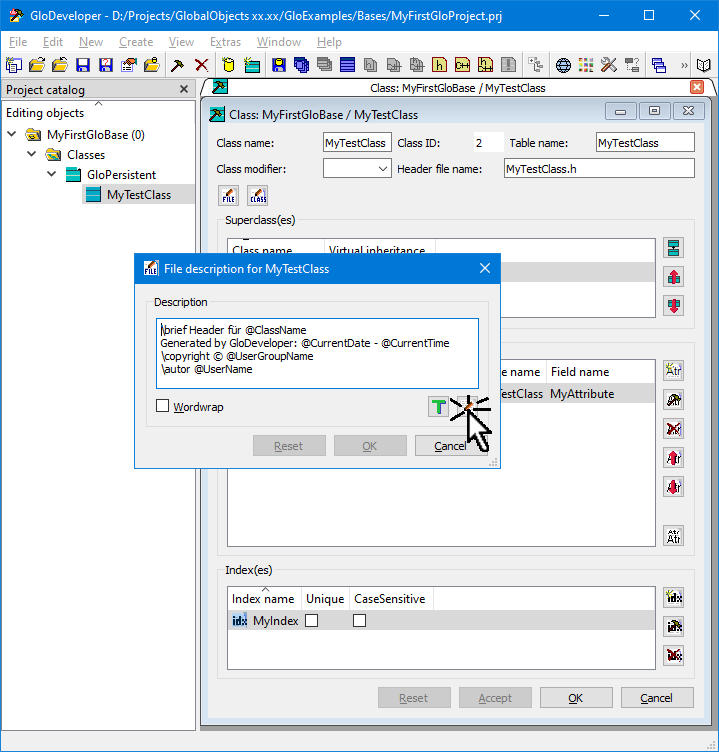
In a dialog a file description can be entered, which is written into the header file of the class.

In a dialog a class description can be entered, which is written into the header file of the class.

One or more superclasses can be selected in a dialog.

An attribute of the class can be edited in a dialog.

All selected attributes of the class are deleted.

All selected attributes of the class are cut and copied to the clipboard.

All selected attributes of the class are copied to the clipboard.

All attributes on the clipboard are inserted into the class.

All attributes of the class, including those of the superclasses, are offered for editing in a dialog.

An index of the class can be edited in a dialog.

The selected index of the class is deleted.
If an entry is selected in the project catalog respectively the project catalog has the focus, the New menu refers to the catalog.
In a database document window the basic information of a new database schema is edited.

In a class document window a new persistent class is designed. If a class is selected, the new class becomes a direct subclass of this selected class, otherwise a direct subclass of glo::Persisten.
If a class in the workspace is active in the document window, the New menu refers to it. The individual menu entries are usually also available as tool buttons on the one class document window.

In a dialog a new attribute can be created for the class.

In a dialog a new index can be created for the class.
In this menu, the creation or updating and saving of individual files can be initiated. Class specific entries are only available if a class is selected in the Project catalog.
The user is always asked whether files should be overwritten.
The Output shows what has been created.
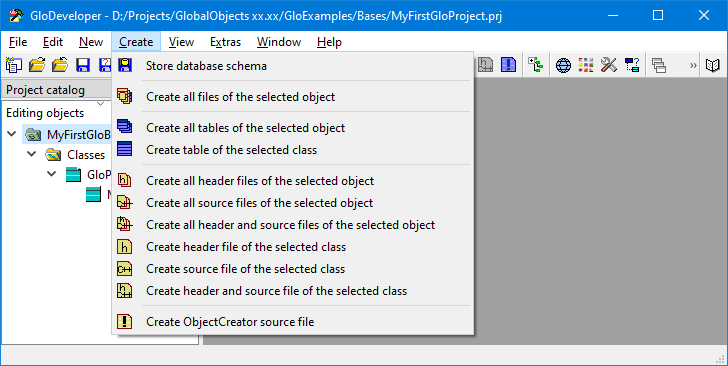

The selected database schema (also indirectly through a selected child element) is saved.

All files of the selected object and derived objects are generated or adjusted. These are the tables, the header and source files of the class(es) and the header file of the object creator.

All tables of the selected object and derived objects are written to the file system.

The table of the selected class is written to the file system.

All header files of the selected object and derived objects are generated or adjusted.

All source files of the selected object and derived objects are generated or adjusted.

All header and source files of the selected object and derived objects are generated or adjusted.

The header file of the selected class is generated or adapted.

The source file of the selected class is generated or adapted.

The header and source file of the selected class is generated or adapted.

The header file of the object creator is generated.
In this menu the catalog view can be influenced.
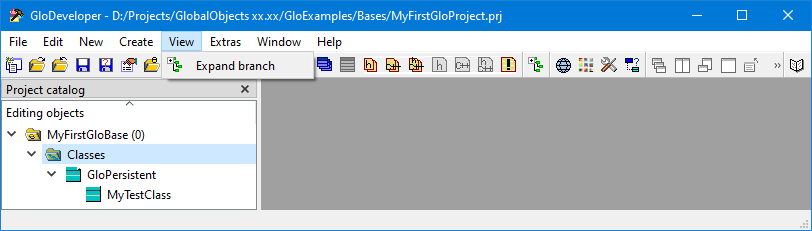
In the Project Catalog the entire lower area of the selected entry is "expanded".
This menu contains additional functions.
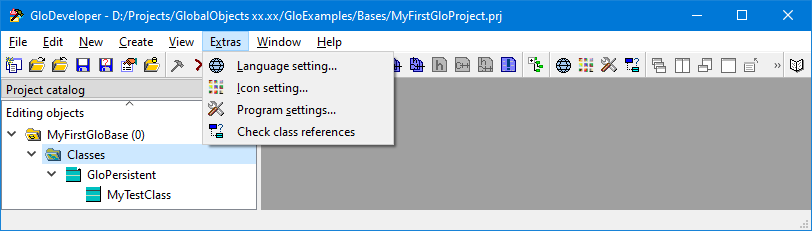

For the GloDeveloper the settings for the language can be made in a dialog.
For the GloDeveloper the settings for displayed icons can be made in a dialog.
Basic settings can be made for the GloDeveloper in a dialog.

All references to classes and attributes are checked for validity. The result is displayed in the Output.
This menu contains the window manipulating functions.

The document windows in the workspace will be arranged overlapping.

The document windows in the workspace will be arranged next to and below each other.

Only has an effect when a document window is maximized. Then the document windows in the workspace are arranged as they were before maximization.

Only has an effect if the current document window is not yet maximized; it will be maximized (fills the entire workspace).

The current document window in the workspace is closed. If changes have been made in the document window, the user is offered to save them before closing.

All document windows in the workspace are closed. If changes have been made in the document windows, the user is offered to save them before closing.

The display of the Project catalog can be switched on or off.

The display of the Output can be switched on or off.
The document windows opened in the workspace are displayed as entries in the Window menu. By selecting a document window, it is brought to the foreground and becomes the current window.
The project, the database and the persistent classes are edited in document windows, which are displayed in the workspace.
A project is initiated with File / New project.... Databases with their persistent classes can be created and edited in projects in GloDeveloper. Only one project per GloDeveloper instance can be edited.
When saving the project, a name must be selected. The project name with the extension ".prj" is the file name. In the title bar of GloDeveloper the file name of the project is displayed.
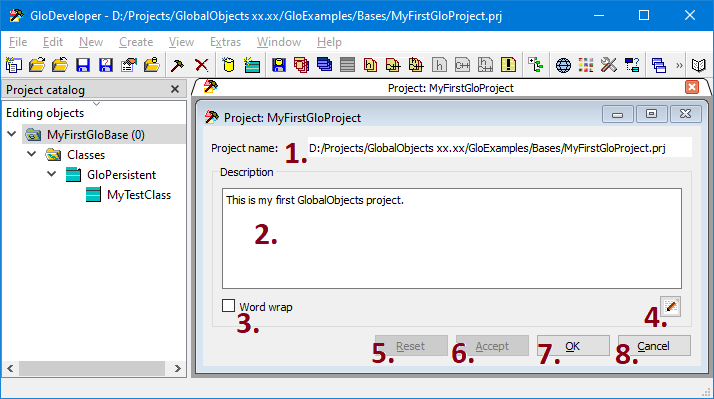
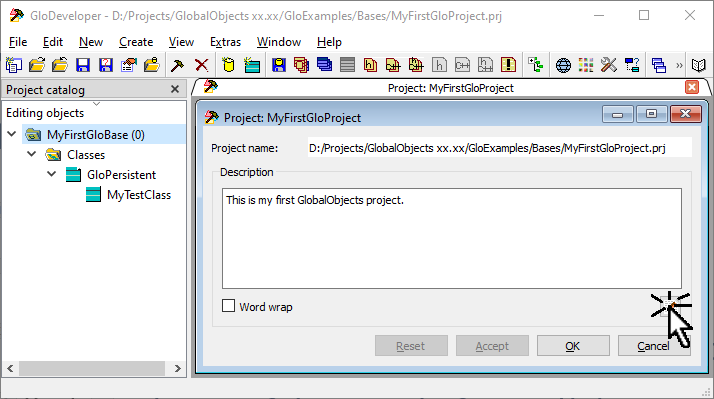
Via File / Project properties... a description of the project can be maintained.

The complete file name of the project is displayed here. This field cannot be edited (project names can be changed by saving it under a different name).
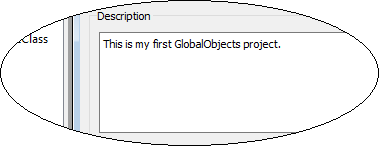
A project can be given a description.
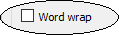
If set, the text in the description is wrapped at the current right frame.

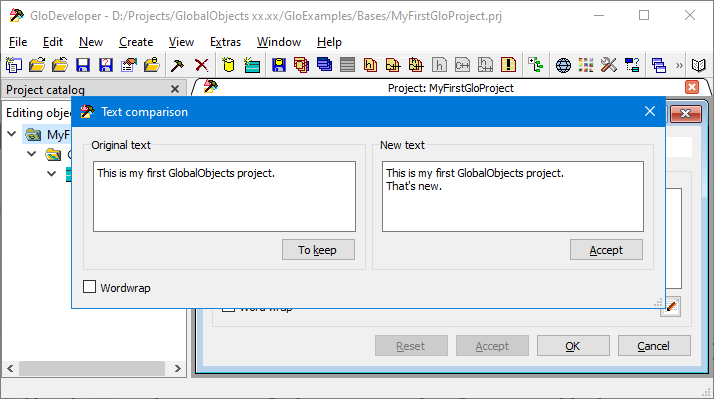
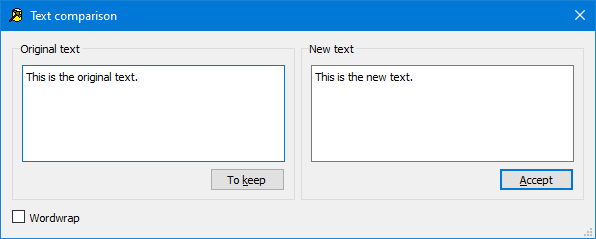
The description of the project can also be made in an external text editor. The prerequisite is that an external text editor is entered in the Program settings / Text settings / Text editor / External Text Editor.
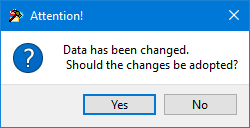
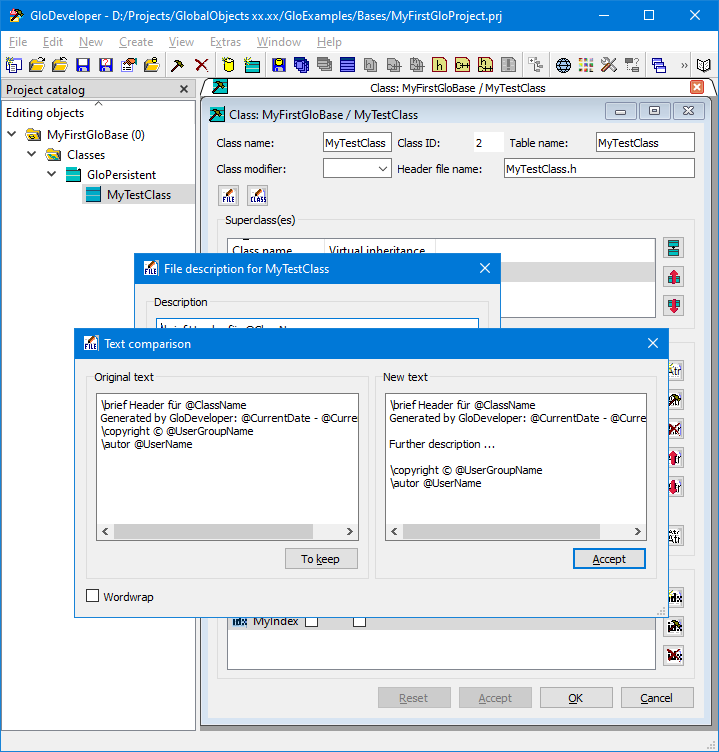
After editing, the original description can be compared with the new text (if there are changes) and the text to be adopted can be selected.
Documentation under construction!
As long as the possibly changed values of the dialog have not yet been accepted, they can be reset to the original value.
The changes are accepted and cannot be restored afterwards.
The editing window is closed. Changes to the dialog values are accepted.
The editing window is closed. If dialog values have been changed, you will be asked whether they should be accepted.
The corresponding database schema can be maintained via File / Transfer database to project..., Edit / Edit database schema... and New / New database....
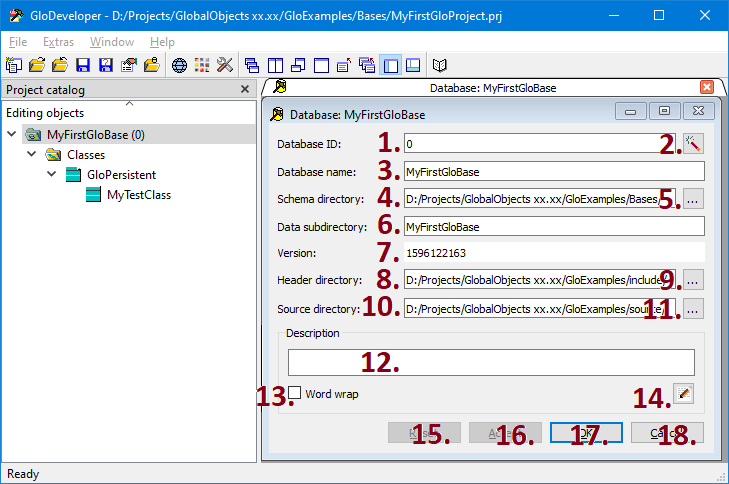

The database ID is displayed in this field; this can be changed.

A unique database ID is generated in the project if the existing one is not unique.

This field displays the database name, which can be changed.

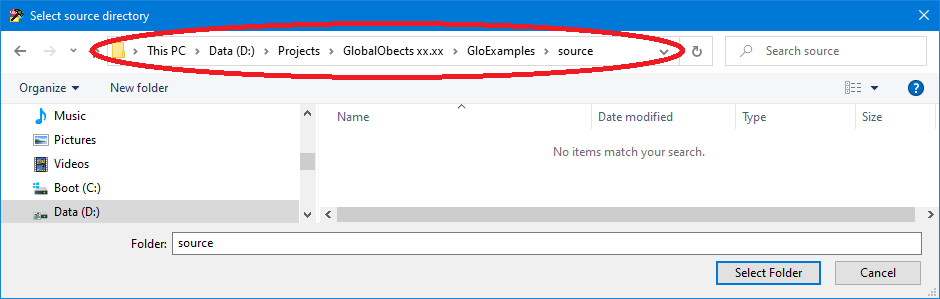
The directory path where the schema should be saved. It is recommended to select the directory via the [...] tool button.

The directory path in which the schema should be saved can be selected via a dialog:
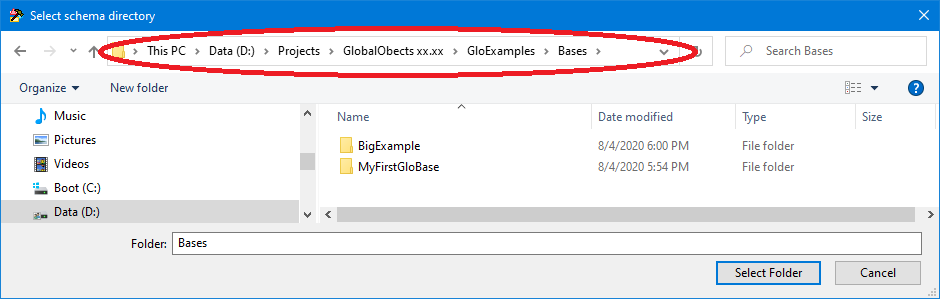
The path in the red marking is relevant!

The data directory, which is basically a subdirectory of the schema directory. The data tables, indexes etc. are stored here.

The current version is displayed. This is automatically assigned when changes are made and cannot be changed here.

The directory in which the header files (.h) of the persistent classes of the database schema should be stored or are already stored. It is recommended to select the directory using the [...] tool button.
The directory in which the header files (.h) of the persistent classes of the database schema should be stored or are already stored can be selected via a dialog:
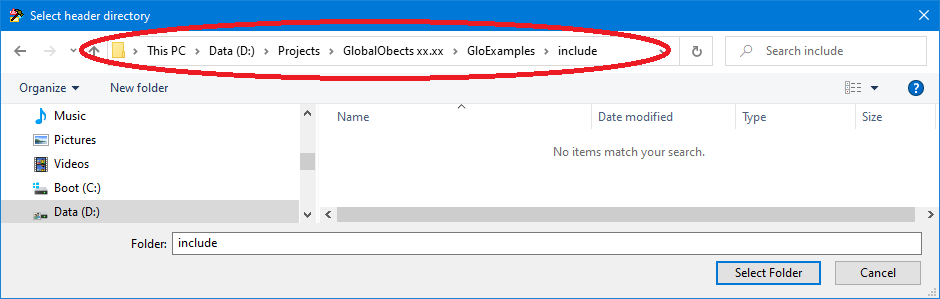
The path in the red marking is relevant!

The directory in which the source files (.cpp) of the persistent classes of the database schema should be stored or are already stored. It is recommended that you select the directory using the [...] tool button.
The directory in which the source files (.cpp) of the persistent classes of the database schema should be stored or are already stored can be selected via a dialog:
The path in the red marking is relevant!
A database can be given a description.

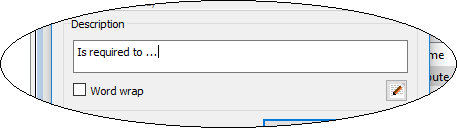
This button is used to enable or disable the line break for the description field.
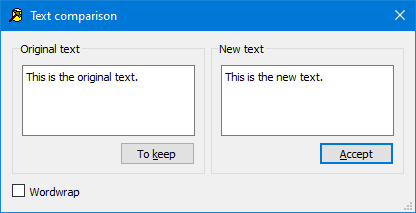
The description can also be made in an external text editor. The prerequisite is that an external text editor is entered in the Program settings / Text settings / Text editor / External Text Editor. After editing, the original description can be compared with the new text (if there are changes) and select the text to be transferred.
As long as the possibly changed values of the dialog have not yet been accepted, they can be reset to the original value.
The changes are accepted and cannot be restored afterwards.
The editing window is closed. Changes to the dialog values are accepted.
The editing window is closed. If dialog values have been changed, you will be asked whether they should be accepted.
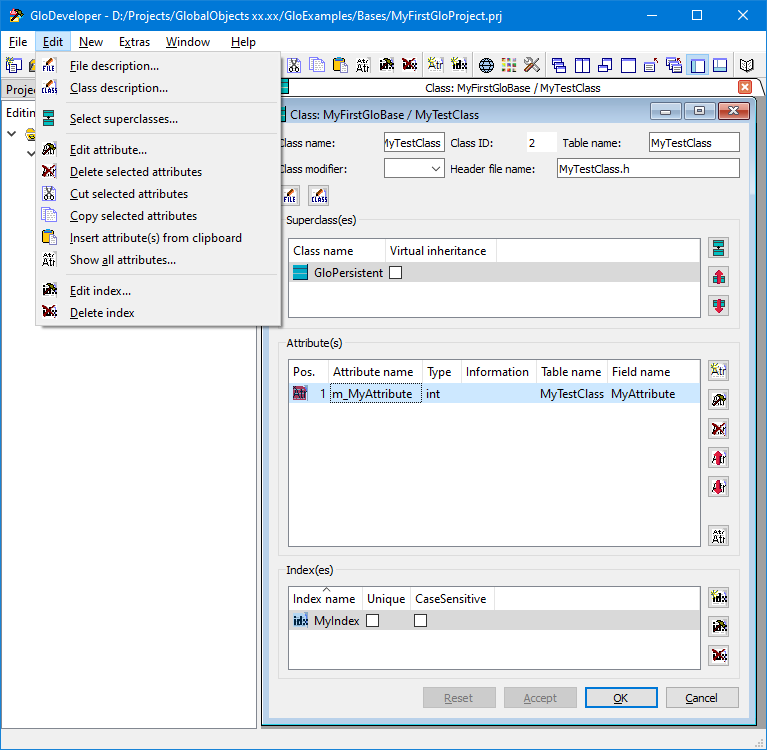
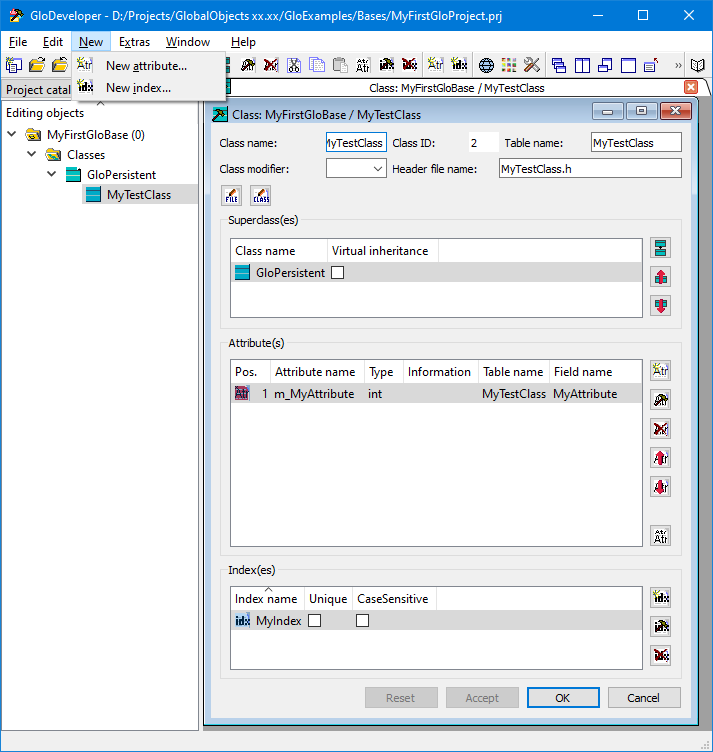
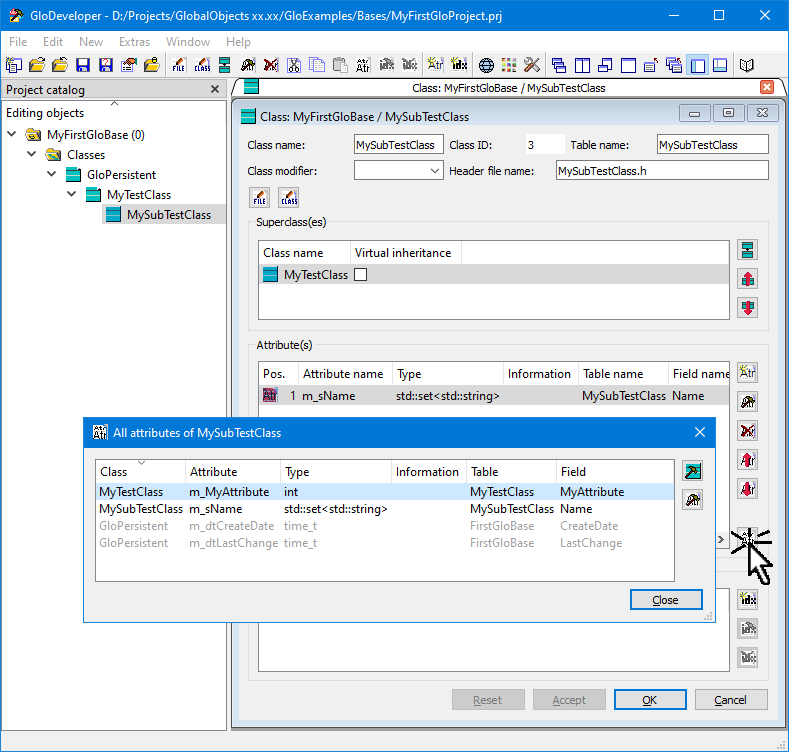
With New / New Class... and Edit / Edit Class... a persistent class can be created and edited.
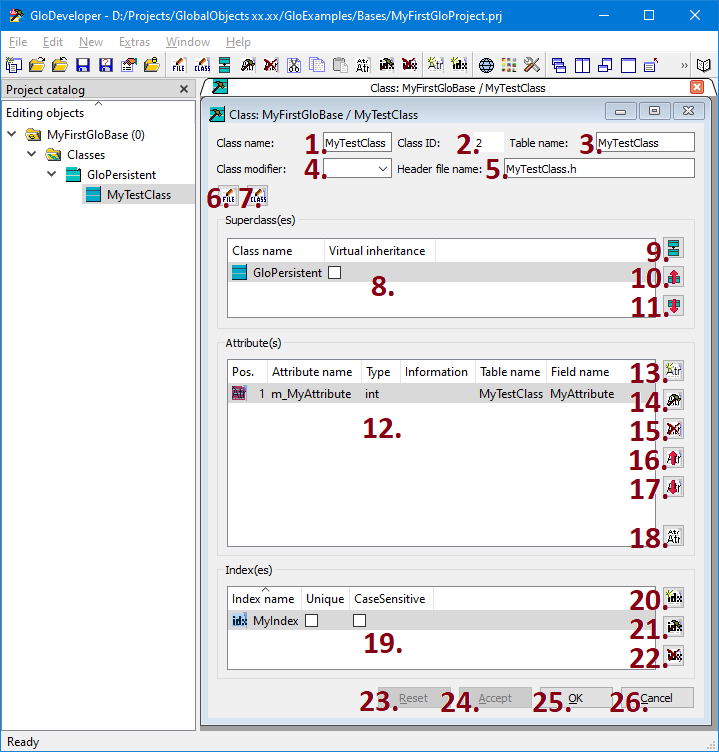

The class description can be entered and changed in this field. It is possible to put namespaces in front of the class designation, separated by two colons (e.g. "MyFirstNameSpace::MaSecondNameSpace::MyClassName").
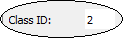
The class ID assigned by the GloDeveloper is displayed here. This cannot be changed here.

In this field the table name can be entered and changed.

In this field, a class modifier such as "__export_dll" can be entered., which is copied into the header file between "class" and the class name. After an input the entry is available for other classes.

The file name can be assigned or changed in this field. When you create it for the first time, the class name is automatically assigned as the header file name. If no header file name is given, no header and source files will be generated. For example, if you have a persistent class "MyClass" in a database "DataBase_1" which you want to use again in another database "DataBase_2", you can copy the class "MyClass" from the database "DataBase_1" into the database "DataBase_2" and there remove the header file name.

Via Edit / File description... or Edit / Class description... a dialog for editing the file respectively class description can be opened. These descriptions are added to the header file as comments.
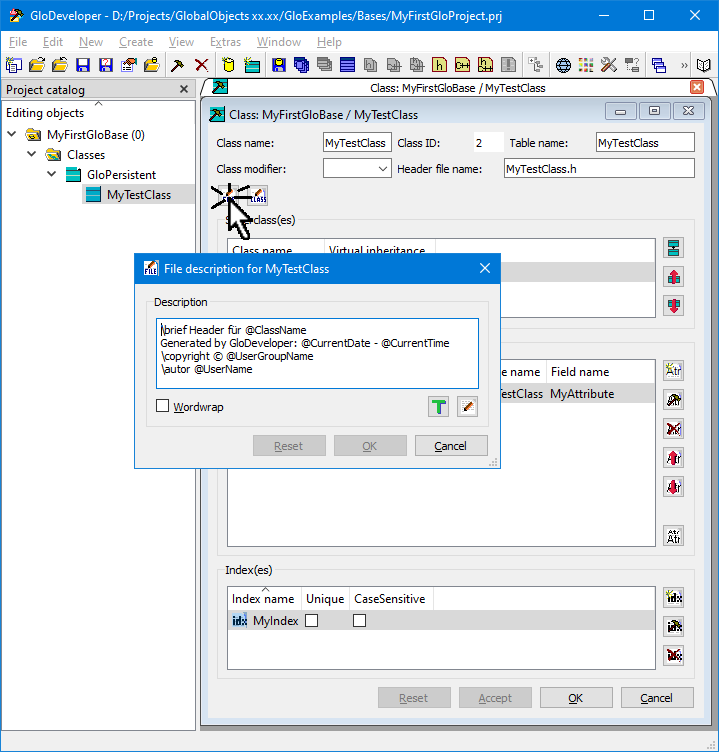
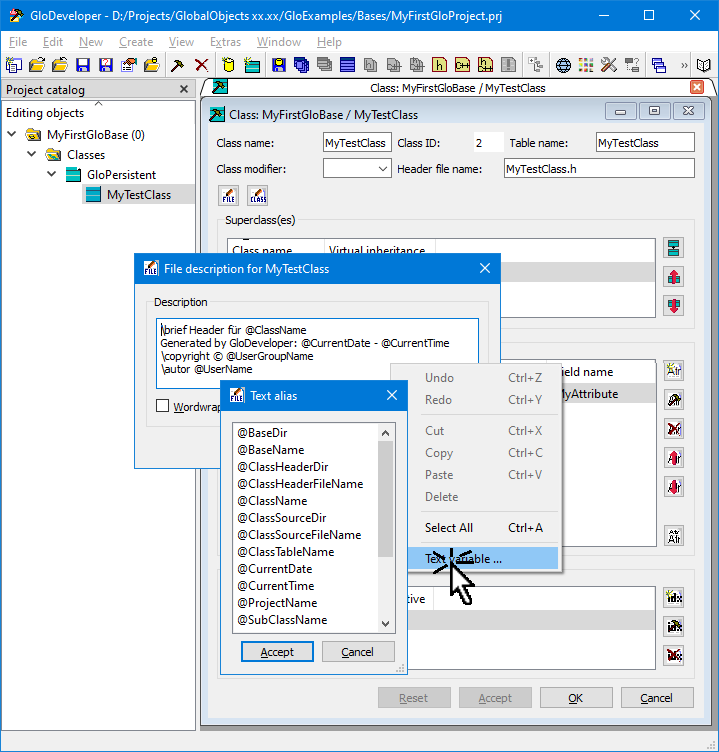
If the right mouse button is pressed in the text input field, a context menu appears. A placeholder for context-sensitive text (e.g., the current date) can be selected and inserted using the Text Variable... menu entry. The placeholder is then replaced in the header file in the respective description with the current context-dependent text.
For further description see Program settings / Text settings / Text variables.
If set, the text in the description is wrapped at the current right frame.

The default file description is set.

The description can also be made in an external text editor. The prerequisite is that an external text editor is entered in the Program settings / Text editor / External Text Editor.
After editing, the original description can be compared with the new text (if there are any changes) and the text to be adopted can be selected.
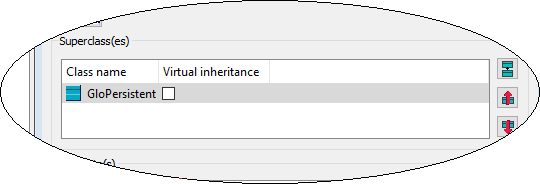
The superclass(es) of the class are displayed here. To avoid the so-called diamond problem in the case of multiple inheritance, the inheritance can be marked as Virtual inheritance.

With Edit / Select superclass... the superclasses of the class can be selected from a dialog in the document. Multiple selection for multiple inheritance is possible.
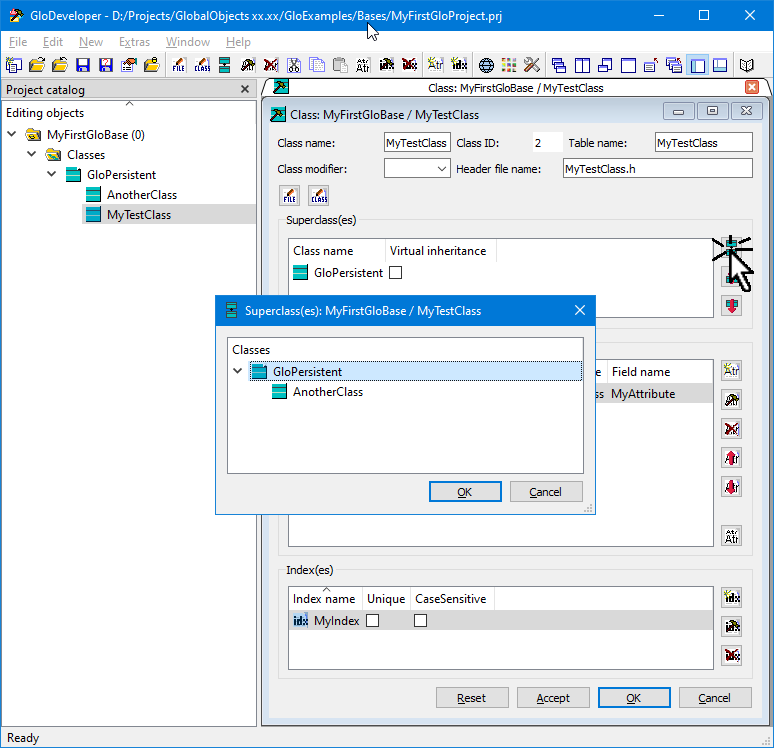


If the class has several superclasses in the dialog, these can be moved in the inheritance sequence (the topmost class is the first in the inheritance sequence).
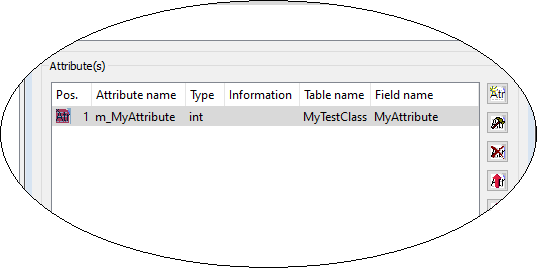
The list of attributes. The attributes are displayed in the order in which they are defined as fields in the table. Attributes can be moved in the order. By double-click left-mouse-button on an attribute, its Editing dialog is displayed.


Via Edit / Edit attribute... or New / New attribute... a dialog for editing a selected attribute or for creating a new attribute can be called up.
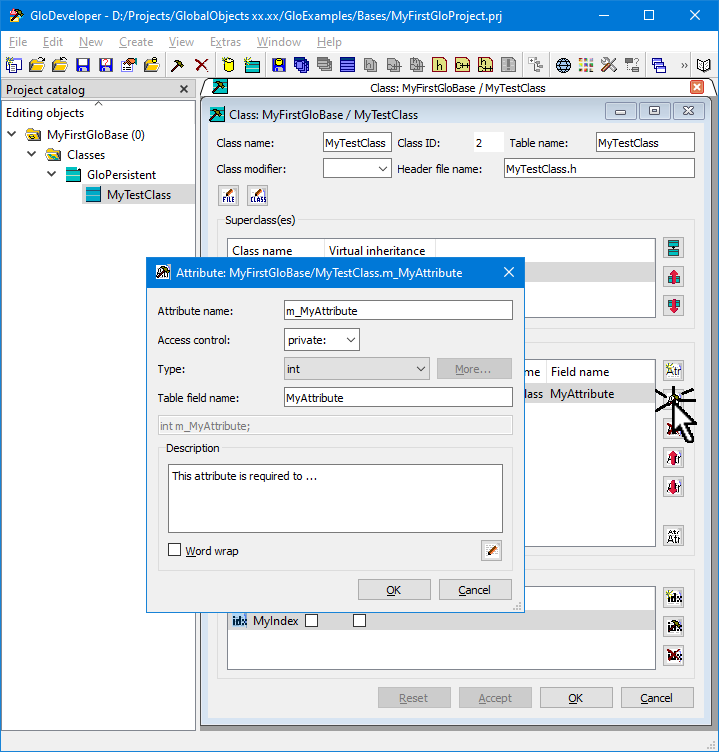

The attribute name can be maintained in this input field.
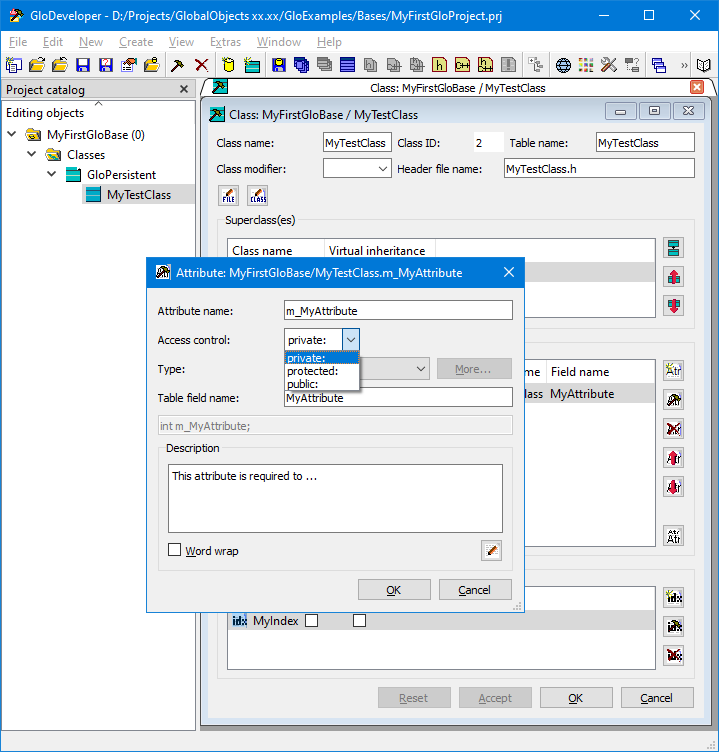
From this Combo Box the access control can be selected.
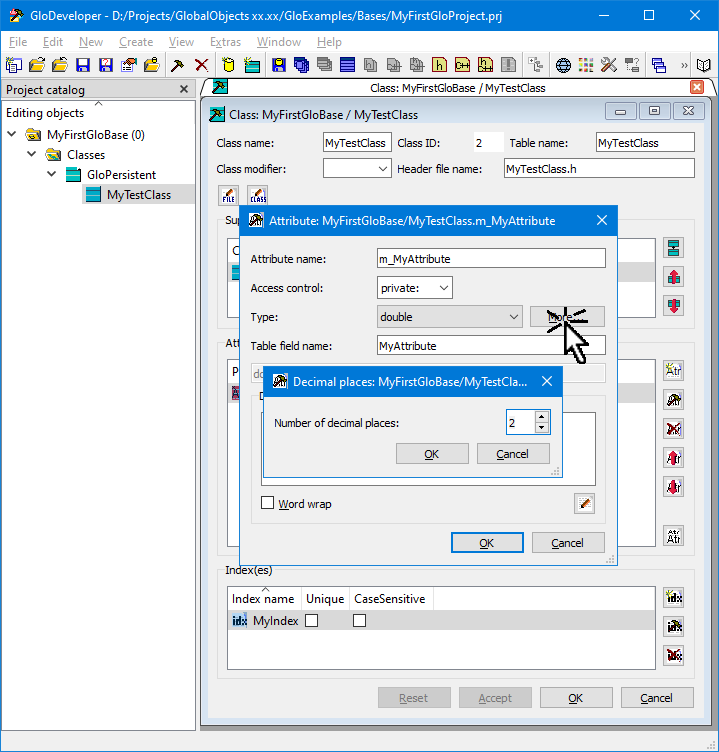
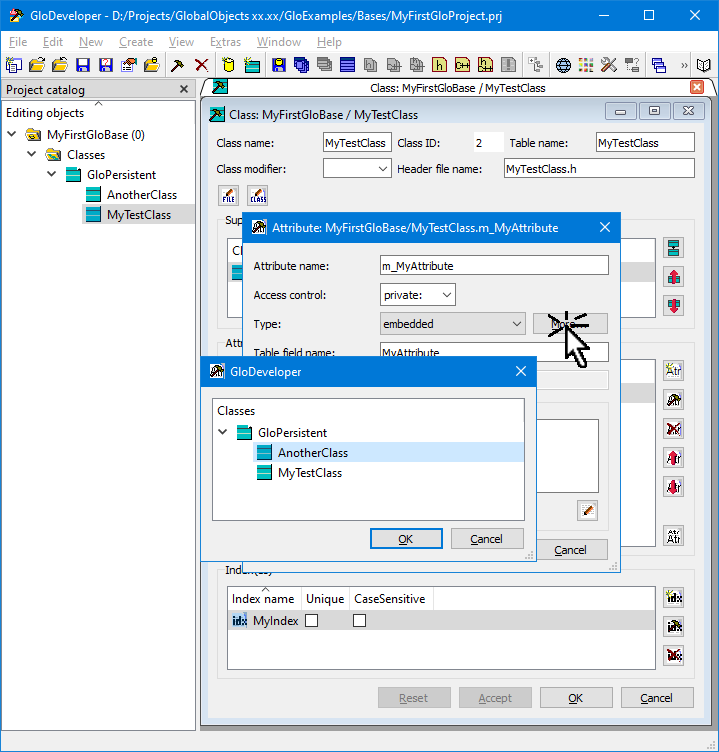
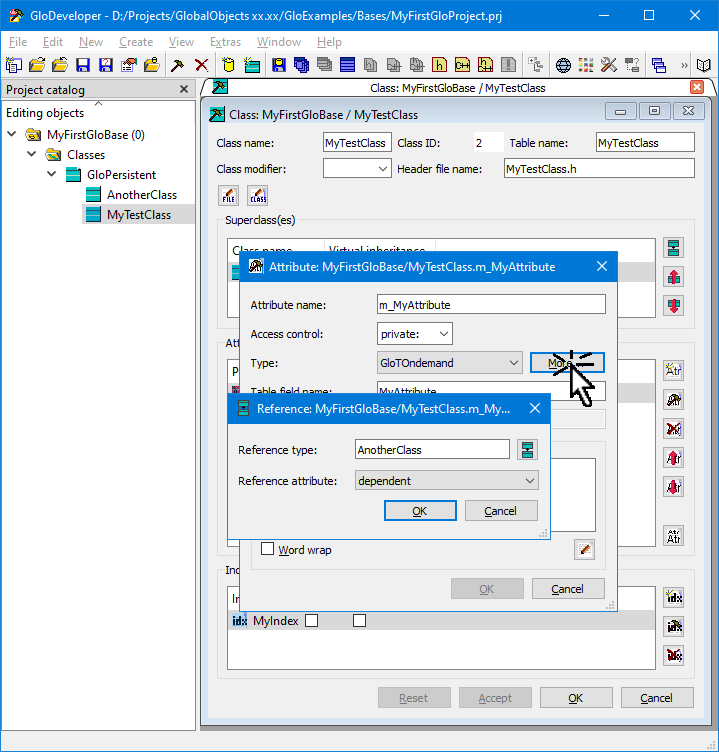
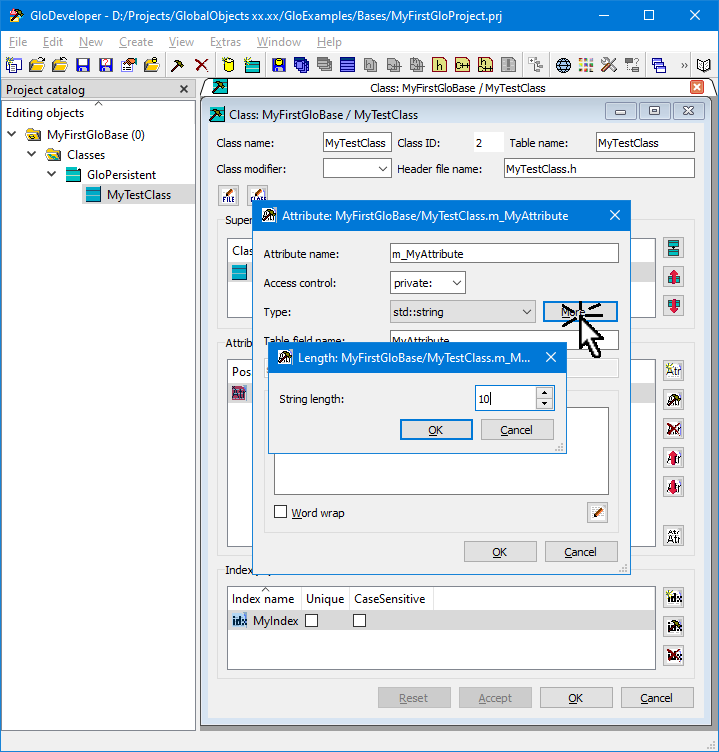
From this Combo Box the supported attribute type can be selected.
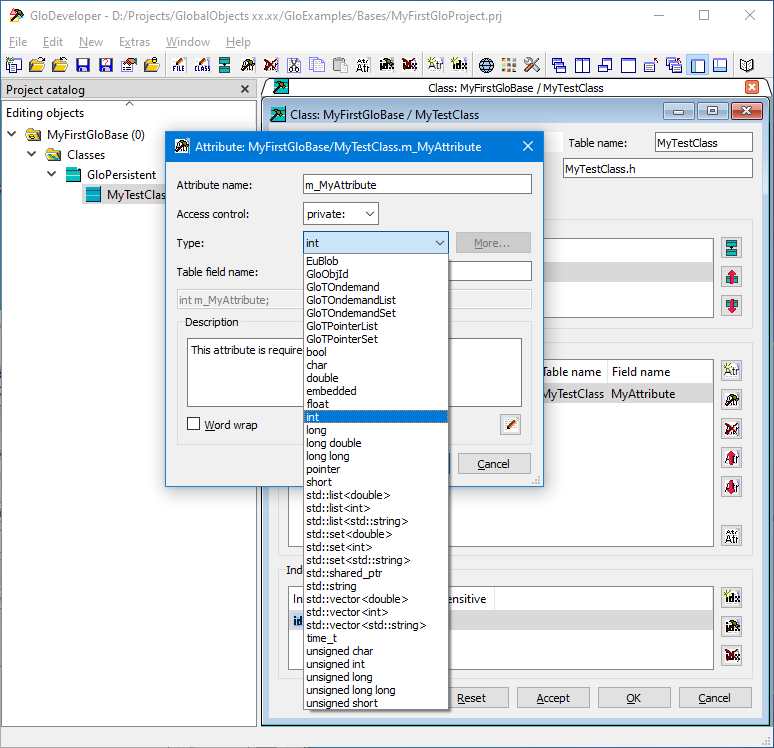
Further information on the supported data types can be found in the GlobalObjects Programming Guide / Glo Data Types.
For some data types further information can or must be selected.
The number of decimal places can be specified for this attribute type, the value is then stored rounded. If the number of decimal places is 0, the value is stored in "scientific-mode" (e.g. the number 123 => "1.230000e+002").
For this attribute type, the type of the persistent class must be selected.
For the attribute types Pointer, std::shared_ptr, glo::TOndemand, glo::TPointerSet, glo::TPointerList, glo::TOndemandList and glo::TOndemandSet, the type of the persistent class must be selected. In addition, a reference attribute dependent can be selected via a Combo Box.
The number of characters allowed can be specified for this attribute type. If the permitted number of characters is 0, the length may be what the system gives ( see also glo::Base::getLimits(std::shared_ptr<glo::LimitRecord>&,const glo::ClassInfoAttribute::Type&) ).

The name of the table field can be entered or changed in this input field.

This display field shows how the attribute looks like in the class declaration (header file).
An attribute can have a description, which is included in the header file as a comment. The handling is the same as for the Class description.

Via Edit / Delete selected attributes the selected attributes can be deleted in the List of attributes. The user must confirm the deletion.


If the class has several attributes in the document, they can be moved up or down individually.

Via Edit / Show all attributes... all attributes, including inherited attributes, are displayed. By double-click left-mouse-buttonon a class name, the class document window of the class is displayed. By double click left mouse button on an attribute name, the dialog for editing the attribute is displayed. By pressing the Enter key the dialog for editing the selected attribute is displayed.
Attributes can be copied or moved by "drag and drop" not only within a class, but also into any other class.
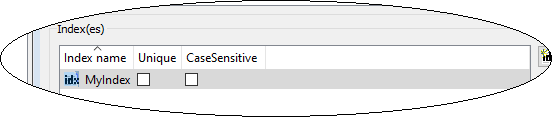
The list of indexes. The two Check Boxes Unique and CaseSensitive can be switched on or off directly in the list display. By double-click left-mouse-button on an index, its editing dialog is displayed.


Via Edit / Edit index... or New / New index... a dialog for editing a selected index or creating a new index can be called up.
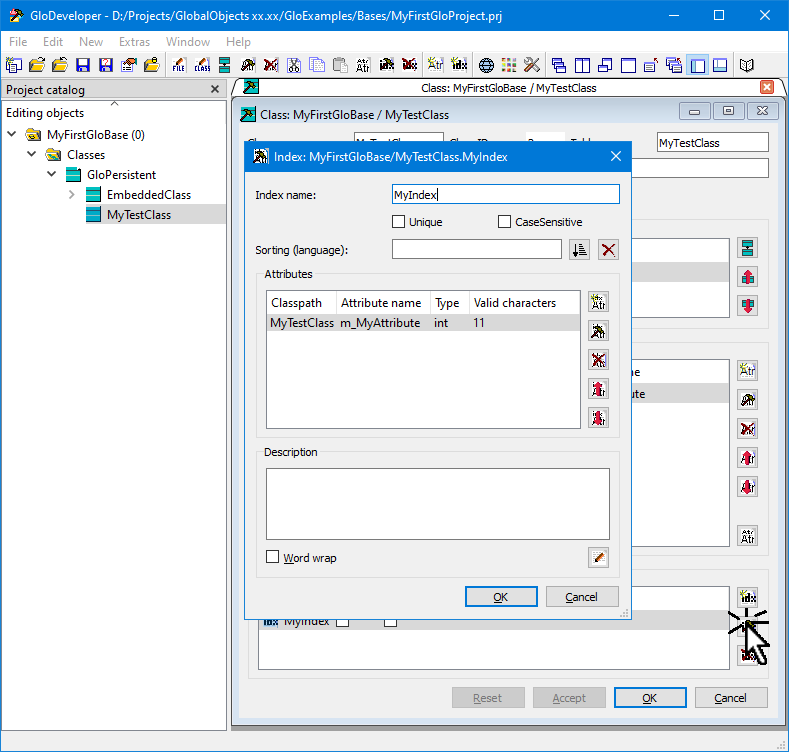

The index name can be maintained in this input field.

An index can be marked as unique. Entries may then only occur once. For example, if a class has a "Name" attribute and this attribute is indexed, there cannot be two objects with the same name.

It can be set whether the entries in the index are differentiated according to upper and lower case. For example, if a class has an attribute "MyName" and this attribute is indexed unique and CaseSensitive, there cannot be two objects with the same name, even if one is "MYNAME" and the other is "myname".

The language for sorting can be set here. The language dependencies are then taken into account (e.g. the German "ä" is interpreted as "ae").
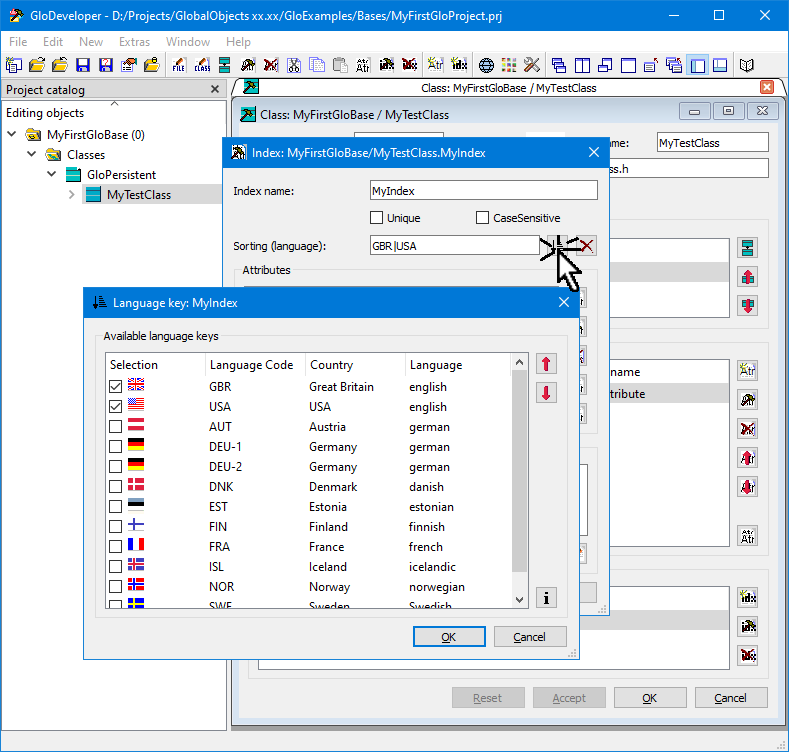
Language keys can be selected via a selection dialog. Since the adjustments are made in the order of the language keys, they can be moved.
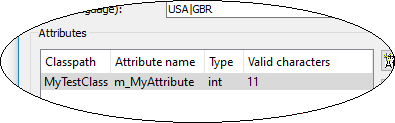
This list shows the individual attributes that are combined in the index. Index attributes can also come from superclasses and it must be specified how many characters of the value of the attribute should be taken into account.
An index can have a description, which is included in the header file as a comment. The handling is the same as for the Class description.
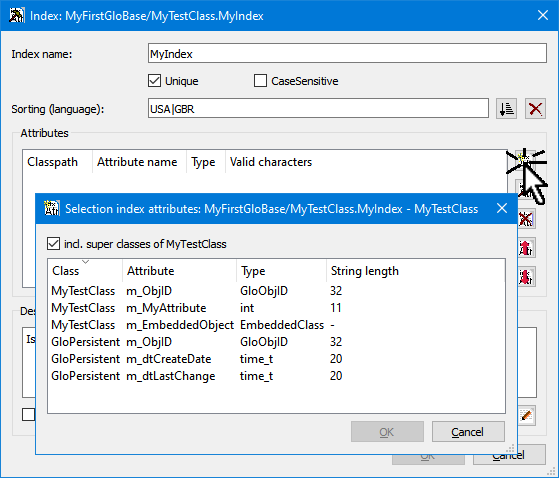
A list of the attributes of the class that have not yet been used is displayed in a list. The display can be restricted to the attributes of the class, the attributes of the superclass are then not displayed. An attribute can be selected with the mouse-double-click-left mouse button or the enter key.
If, for example, an attribute of an embedded class is to be used in the index,
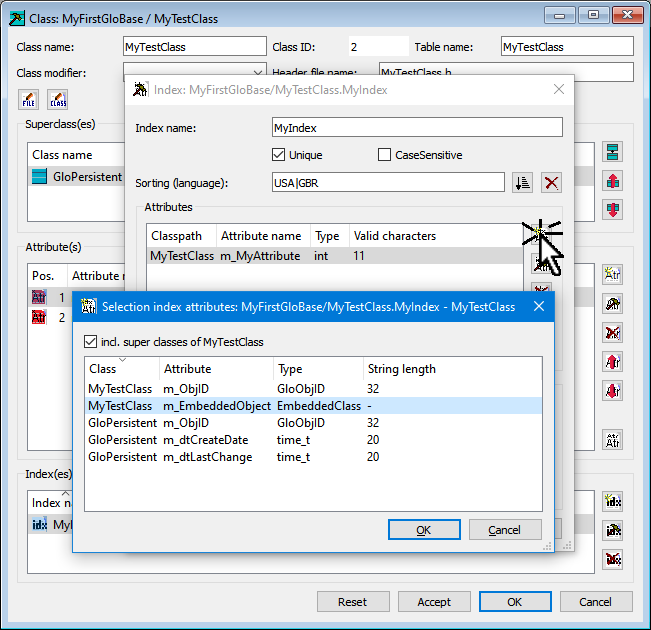
the attributes of the embedded class are displayed when you select the attribute of the embedded class, where you can make your selection.
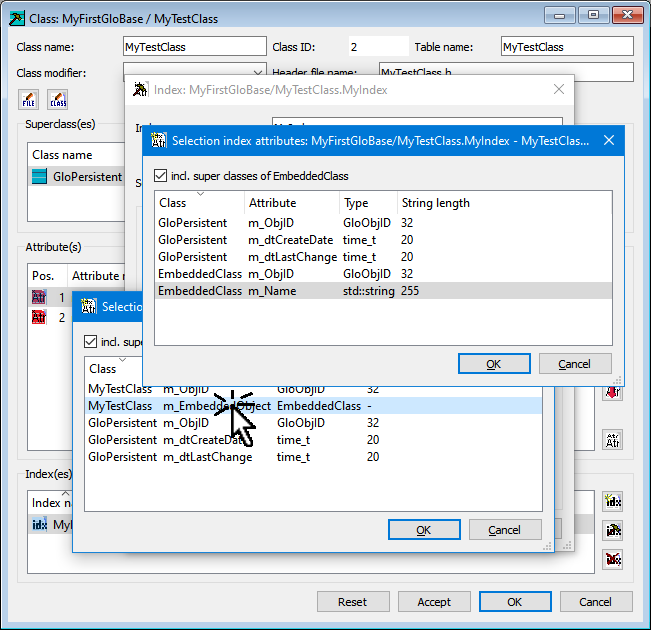
After making a selection, you can start editing (see next point).
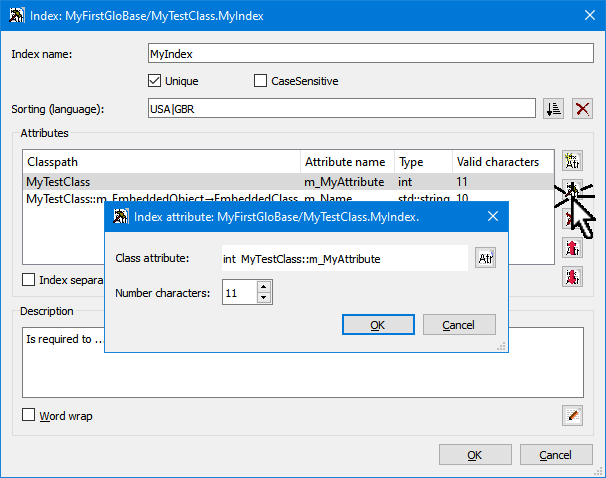
In this dialog the attribute can be changed. In the main, the number of characters to be considered for the index can be set here.

The selected index attribute is removed from the index. The user must confirm the deletion.


If the index has multiple attributes, they can be moved in order. The order determines the assembly of the value of the index entry.
Via Edit / Delete index the selected index can be deleted in the list of Indexes. The user must confirm the deletion.
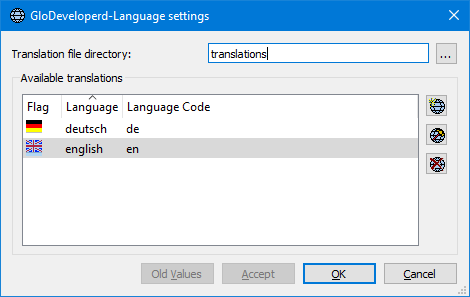
The GloDeveloper can be set to a different language. The language files must be stored in the specified translation file directory, which must be in the execution directory of the application.
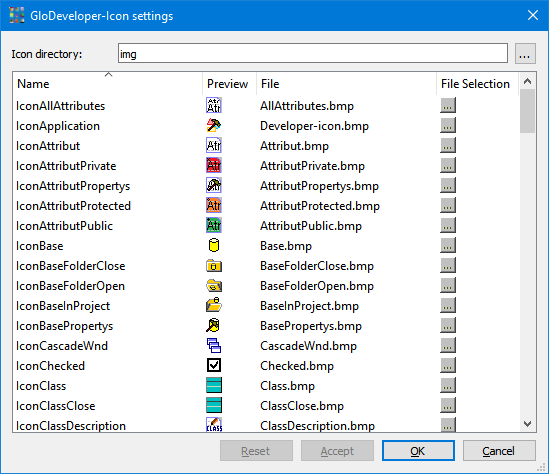
The icons used in GloDeveloper can be changed in detail by reference to an image file (BMP or PNG). The icon directory can also be changed so that all icons can be replaced at once.
The GloDeveloper has some settings, which the user can adjust according to his taste.
These settings affect the editing of comments.
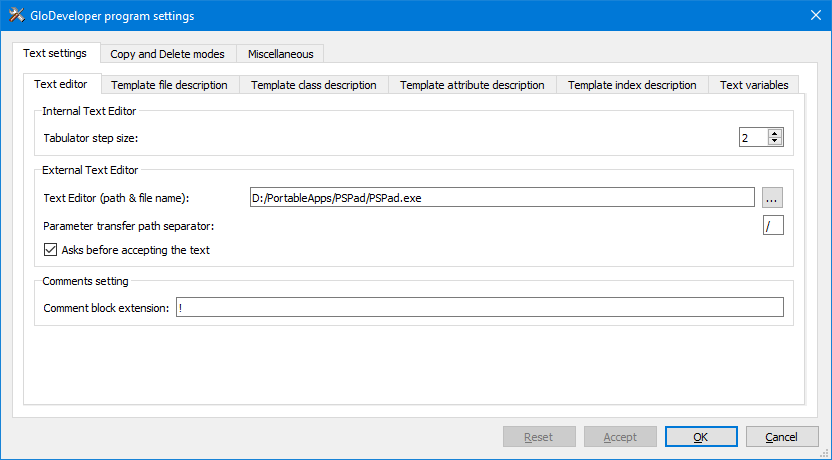
Internal Text Editor The tabulator step size for the description texts can be set here.
External Text Editor An external editor can be set up for editing the descriptions. Since some editors are a bit strict with the type of path separator (times '/' or '\'), this can also be specified.
Comments block Extension A comment block is introduced with a slash asterisk and ended with an asterisk slash. The comment block start sequence can be expanded. This is due to the tool doxygen, which expects e.g. a "!" for its analysis run.
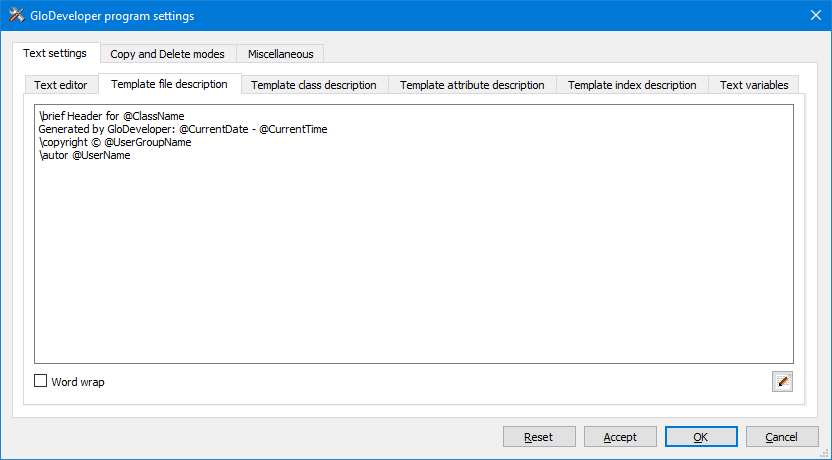
A template can be created for the file, class, attribute and index descriptions. The handling is the same as for the Class description.

Text variables can be included in the descriptions. During file creation, these variables are replaced by the current values. Thus, for example, the class name can be changed without having to maintain it in a description. The 'visible name' is entered in the respective text, which can be changed here with double-click-left mouse button.
| Name | Description |
|---|---|
| AttributeFieldName | The table field name in which the attribute is stored. See also Create / edit attribute - Table field name.
|
| AttributeFieldPosition | The column position of the attribute in the table results from the position in the Display of the attributes.
|
| AttributeName | The name of the attribute in the class. See also Create / edit attribute - Attribute name.
|
| AttributeType | The type of the attribute in the class. See also Create / edit attribute - Display of the attribute in the class declaration.
|
| AttributeTypeInfo | A perhaps additional information about the type of the attribute, e.g. the string length. See also Create / edit attribute - Type.
|
| BaseDir | The complete path where the database is stored. See also Set the schema directory. |
| BaseName | The name of the database. See also Assign / change database name. |
| ClassHeaderDir | The complete path where the header file of the class is stored. See also Set header file directory. |
| ClassHeaderFileName | The name of the header file of the class, usually results from the class name with appended ".h". |
| ClassName | The name of the class. See also Assign / change class name. |
| ClassSourceDir | The complete path where the source file of the class is stored . See also Set source file directory. |
| ClassSourceFileName | The name of the source file of the class, results from the class name with the prefix "glo_" and attached ".cpp". |
| ClassTableName | The name of the table. See also Assign / change table name. |
| CurrentDate | The current date. The format can be set here. |
| CurrentTime | The current time. The format can be set here. |
| ProjectName | The name of the project. See also Project name. |
| SubClassName | The name(s), separated by commas, of the direct subclass(es) of this class. |
| SuperClassName | The name(s), separated by commas, of the direct supperclass(es) of this class. |
| UserGroupInitial | The initials of the user group. The initials can be entered here. |
| UserGroupName | The name of the user group. The name can be entered here. |
| UserInitial | The initials of the user. The initials can be entered here. |
| UserName | The name of the user. The name can be entered here. |
| Version | The version of the database. See also Schema version display. |

For the text variable CurrentDate the format can be set.
| Expression | Output |
|---|---|
| d | the day as number without a leading zero (1 to 31) |
| dd | the day as number with a leading zero (01 to 31) |
| ddd | the abbreviated localized day name (e.g. 'Mon' to 'Sun'). Uses QDate::shortDayName(). |
| dddd | the long localized day name (e.g. 'Monday' to 'Sunday'). Uses QDate::longDayName(). |
| M | the month as number without a leading zero (1 to 12) |
| MM | the month as number with a leading zero (01 to 12) |
| MMM | the abbreviated localized month name (e.g. 'Jan' to 'Dec'). Uses QDate::shortMonthName(). |
| MMMM | the long localized month name (e.g. 'January' to 'December'). Uses QDate::longMonthName(). |
| yy | the year as two digit number (00 to 99) |
| yyyy | the year as four digit number. If the year is negative, a minus sign is prepended in addition. |

For the text variable CurrentTime the format can be set.
| Expression | Output |
|---|---|
| h | the hour without a leading zero (0 to 23 or 1 to 12 if AM/PM display) |
| hh | the hour with a leading zero (00 to 23 or 01 to 12 if AM/PM display) |
| H | the hour without a leading zero (0 to 23, even with AM/PM display) |
| HH | the hour with a leading zero (00 to 23, even with AM/PM display) |
| m | the minute without a leading zero (0 to 59) |
| mm | the minute with a leading zero (00 to 59) |
| s | the second without a leading zero (0 to 59) |
| ss | the second with a leading zero (00 to 59) |
| z | the milliseconds without leading zeroes (0 to 999) |
| zzz | the milliseconds with leading zeroes (000 to 999) |
| AP or A | use AM/PM display. AP will be replaced by either "AM" or "PM". |
| ap or a | use am/pm display. ap will be replaced by either "am" or "pm". |
| t | the timezone (for example "CEST") |
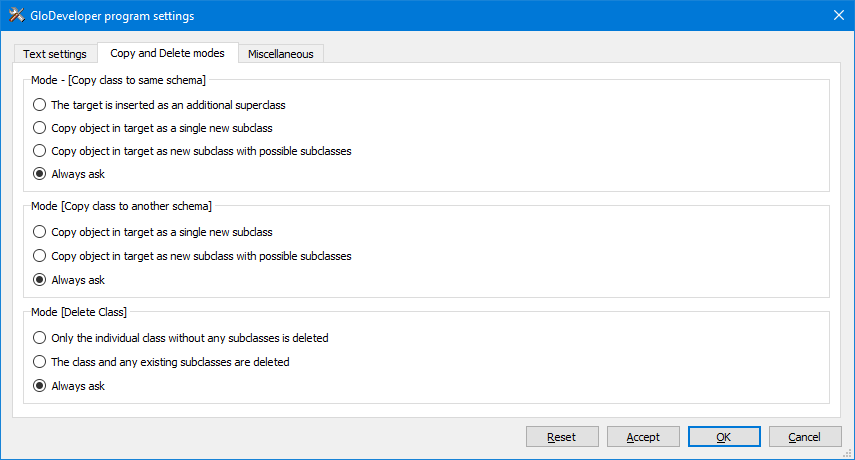
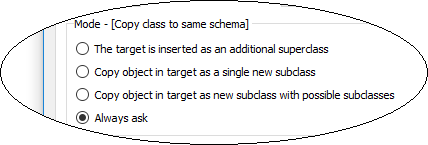
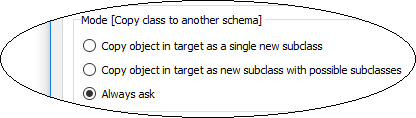
Here you can set the behavior of GloDeveloper when copying (via Drag and Drop) a class to the same or to another schema.
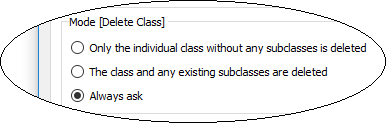
Here you can set the behaviour of the GloDeveloper when deleting a class.
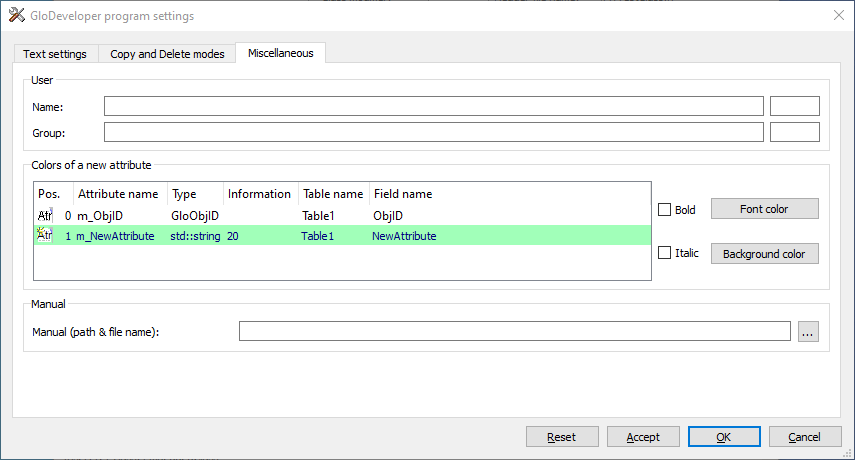

The values for the text variables UserName, UserInitial, UserGroupName and UserGroupInitial can be entered here.
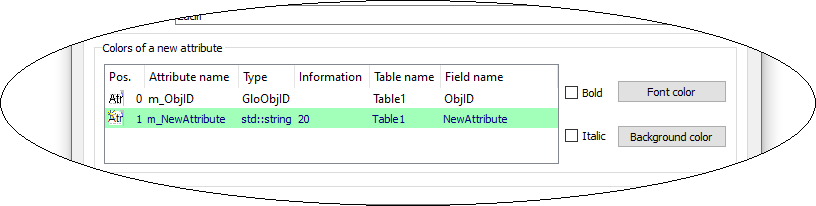
Here you can change the display of a newly created attribute or index.

GlobalObjects uses the keywords 'persistent' and 'transient' in the generated header files to delimit the area of persistent attributes.
Not all documentation tools, such as Doxygen, can handle this. The following transient attributes are not recognized correctly. To avoid this, additional instructions can be added before and after the keywords 'persistent' and 'transient'.

Here the GloDeveloper manual can be referenced. This is usually done by the GlobalObjects-Setup program.